How to Record a Voice-Over Lecture in PowerPoint
This guide will go through the process of recording, previewing, saving, and accessing a voice-over PowerPoint (VOPPT) lecture for VUSN in Microsoft PowerPoint. This guide uses PowerPoint 2010 on a computer running Windows 7 as an example, though many of the steps are the same for different versions of PowerPoint and on different platforms
Topics
- Setting Up PowerPoint 2010 to Record Narration
- Navigating Your Presentation While Recording
- Re-recording a Slide
- Other Recording Tips & Tricks
- Previewing Your Audio Presentation
- Saving Your Audio Presentation
- Accessing VOPPT Presentations
Please note: It is strongly advised that you use a Windows-based computer to record your presentation, as this ensures consistency during the conversion-to-video process. If you are recording your presentations on a Mac you should still be able to use this guide, assuming you are running Office for Mac 2011 or later. Please read all sections of this guide before contacting the IMC. Something that may not seem clear might be covered in another section. This guide may be updated periodically with additional information if necessary.
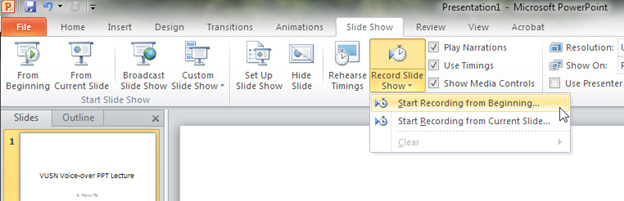
Setting Up PowerPoint to Record Narration
- Open your presentation either by double-clicking the file itself, or by opening PowerPoint and using the
File > Openmenu option - Click on the
Slide Showtab at the top of the screen
- Click the down arrow next to
Record Slide Showand click theStart Recording from Beginningmenu option /li>
- Make sure both checkboxes are checked, then click the
Start Recordingbutton
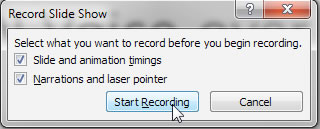
Please note: Your presentation will begin recording immediately once pressing the Start Recording button. Please make sure you are ready to start recording before proceeding.
Navigating Your Presentation While Recording
- To move forward to the next slide, either left-click the mouse, or you can press the right arrow key on your keyboard.
- If you need to pause the presentation for any reason, you can do so by right-clicking anywhere on the screen, and choosing the
Pause Recordingoption from the menu that appears. To resume narration, click theResume Recordingbutton that appears once the presentation has been paused.
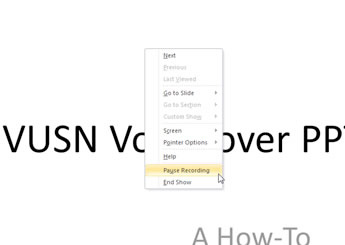
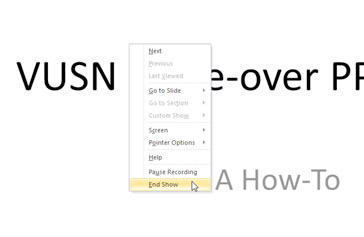
- To exit your presentation early, right-click anywhere on the screen and select
End Showfrom the bottom of the menu that appears.
Re-recording a Slide
Please note: if you choose to re-record a slide, the original sound file is overwritten and there is no way to get it back.
- From the
Slide Sorterview, highlight the slide you wish to re-record by clicking on it.
- From the
Record Slide Showmenu under theSlide Showtab at the top, click theStart Recording from Current Slideoption - Click the Start Recording button in the box that appears
- Once you are finished recording the slide, right-click anywhere on the screen and choose End Show from the menu that appears
- Your slide will have the new timing underneath. Check the slide to make sure it recorded properly
Other Recording Tips & Tricks
- If you have a Polycom telephone (using Microsoft Lync/Skype for Business), you must forward your calls to voice mail while the presentation is recording. Otherwise, any call that comes through during your recording may be picked up by your recording device.
- When recording and preparing to move to the next slide, pause for 1-2 seconds before continuing. This ensures that all audio you meant to capture on your slide will play.
- If you mess up on a slide, continue on with the rest of the presentation. You can go back and re-record selected slides once you are finished.
Previewing Your Audio Presentation
Before saving your presentation, you should check to make sure your voice was actually captured and saved in the presentation.
- Look for the icons that indicate slide duration and the presence of an audio file. These are marked on the image below.
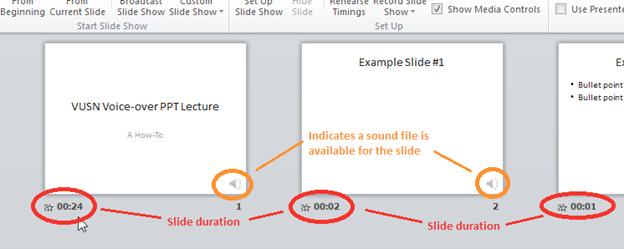
- To preview an individual audio file, click the star icon underneath the slide, next to the slide duration. The sound file icon on the slide will disappear and the audio will begin to play. If you do not hear your voice, then that slide did not capture that part of your presentation and must be re-recorded.
- Check several slides to ensure that your recording device did not cut out for only a handful of slides.
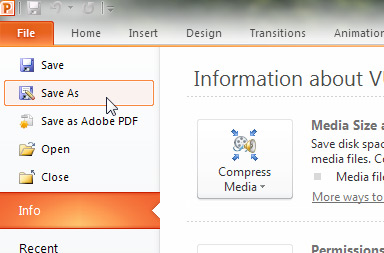
Saving Your Audio Presentation
- From the main PowerPoint screen, click the
File > Save Asmenu option. You will be prompted for a save location. Save to a location you can find easily on your computer/flash drive
Please Note: You MUST save your presentation with a .PPTX extension, not the older .PPT extension. If you are using the newest version of PowerPoint and you save your presentation with the .PPT extension, your audio will be lost and there is no way to get it back; you will have to re-record your entire presentation.
- Copy the file from your computer to one of the specified locations on the VUSN servers
—File > J:\data\dropbox\faculty_staff\voppt
—\\nurse-s2\vol2\tobeaddedtobb
Please note: Your file *must* be in one of these two locations. Your presentation will not be found and converted if you do not save to one of these locations.
- Send an e-mail to John Norfleet with the following information
— Course ID #
— Course coordinator who may post the converted link
— Estimated date of need
Please note: Your message *must* contain this information in order for the IMC to name the file correctly on the media server. Your presentation will not be ready until the correct information is received by the IMC.
***If you can’t upload your file to the VUSN servers…***
If you do not have access to the J: drive or \\nurse-s2 folder, you may save your file to a flash drive/CD/portable device and bring it directly to the IMC for a manual transfer. Presentation information (course ID #, etc.) is still required to complete the conversion process.
Alternatively, you may also upload your presentation to Box, located at http://it.vanderbilt.edu/services/box. You must log in with your VUNet ID and password, then upload your file according to the instructions displayed on the site. When prompted, be sure to enter john.norfleet@vanderbilt.edu in the ‘send e-mail to’ box so a copy of the download link is sent to the IMC.
Accessing VOPPT Presentations
Once a presentation has been converted, there are two ways of receiving the link to the converted file. You/the course coordinator will receive an e-mail with one of the following types of links:
- A URL to a list containing all VOPPT files in the specified course for the current semester and academic year. This list automatically updates whenever a new presentation is converted.
- A direct URL to the flash video, which may be copied/pasted however it is needed in Blackboard
By default, you will initially receive the list of all converted/available VOPPTs. This list contains multiple links for each lecture, including links for Flash player, RealPlayer, and mobile players such as iPad or Android devices.
After you receive the VOPPT list, you can use the list to check for updates when new presentations have been submitted for conversion. Currently, e-mails are not sent out about availability, unless specified by the instructor to do so.
If you do not want to use the list of lectures, you may copy/paste the Flash link for each lecture from the list into Blackboard however they need to be set up in the course. Individual links to lectures will *not* be sent through e-mail unless requested by the instructor.
![]()
![]()
![]()